Owncast
An open-source platform for self-hosted live video streaming with viewer interaction (chat).
Description
Owncast is an open-source, self-hosted platform for live video streaming. It allows creators to broadcast content directly to their audience. It features built-in chat and customization options. Everything in a form of a sleek web interface.
Comparison
Alternative to: Twitch, YouTube
✅ Decentralized archiecture
✅ No reliance on a central company
✅ No restrictive nor opaque content policies
✅ No extensive data collection
✅ Robust streaming solution
✅ Easy setup and maintenance
✅ Official Docker container available
❌Limited audience reach for now
❌Lacks advanced analytics
❌High bandwidth required for larger events
Highlights
- General: ★★★★★
- Owncast includes an HTTP server as part of its implementation. If encrypted communication using HTTPS is needed, which is practically essential nowadays, an additional web server like Apache or NGINX must be installed to create a reverse proxy with TLS.
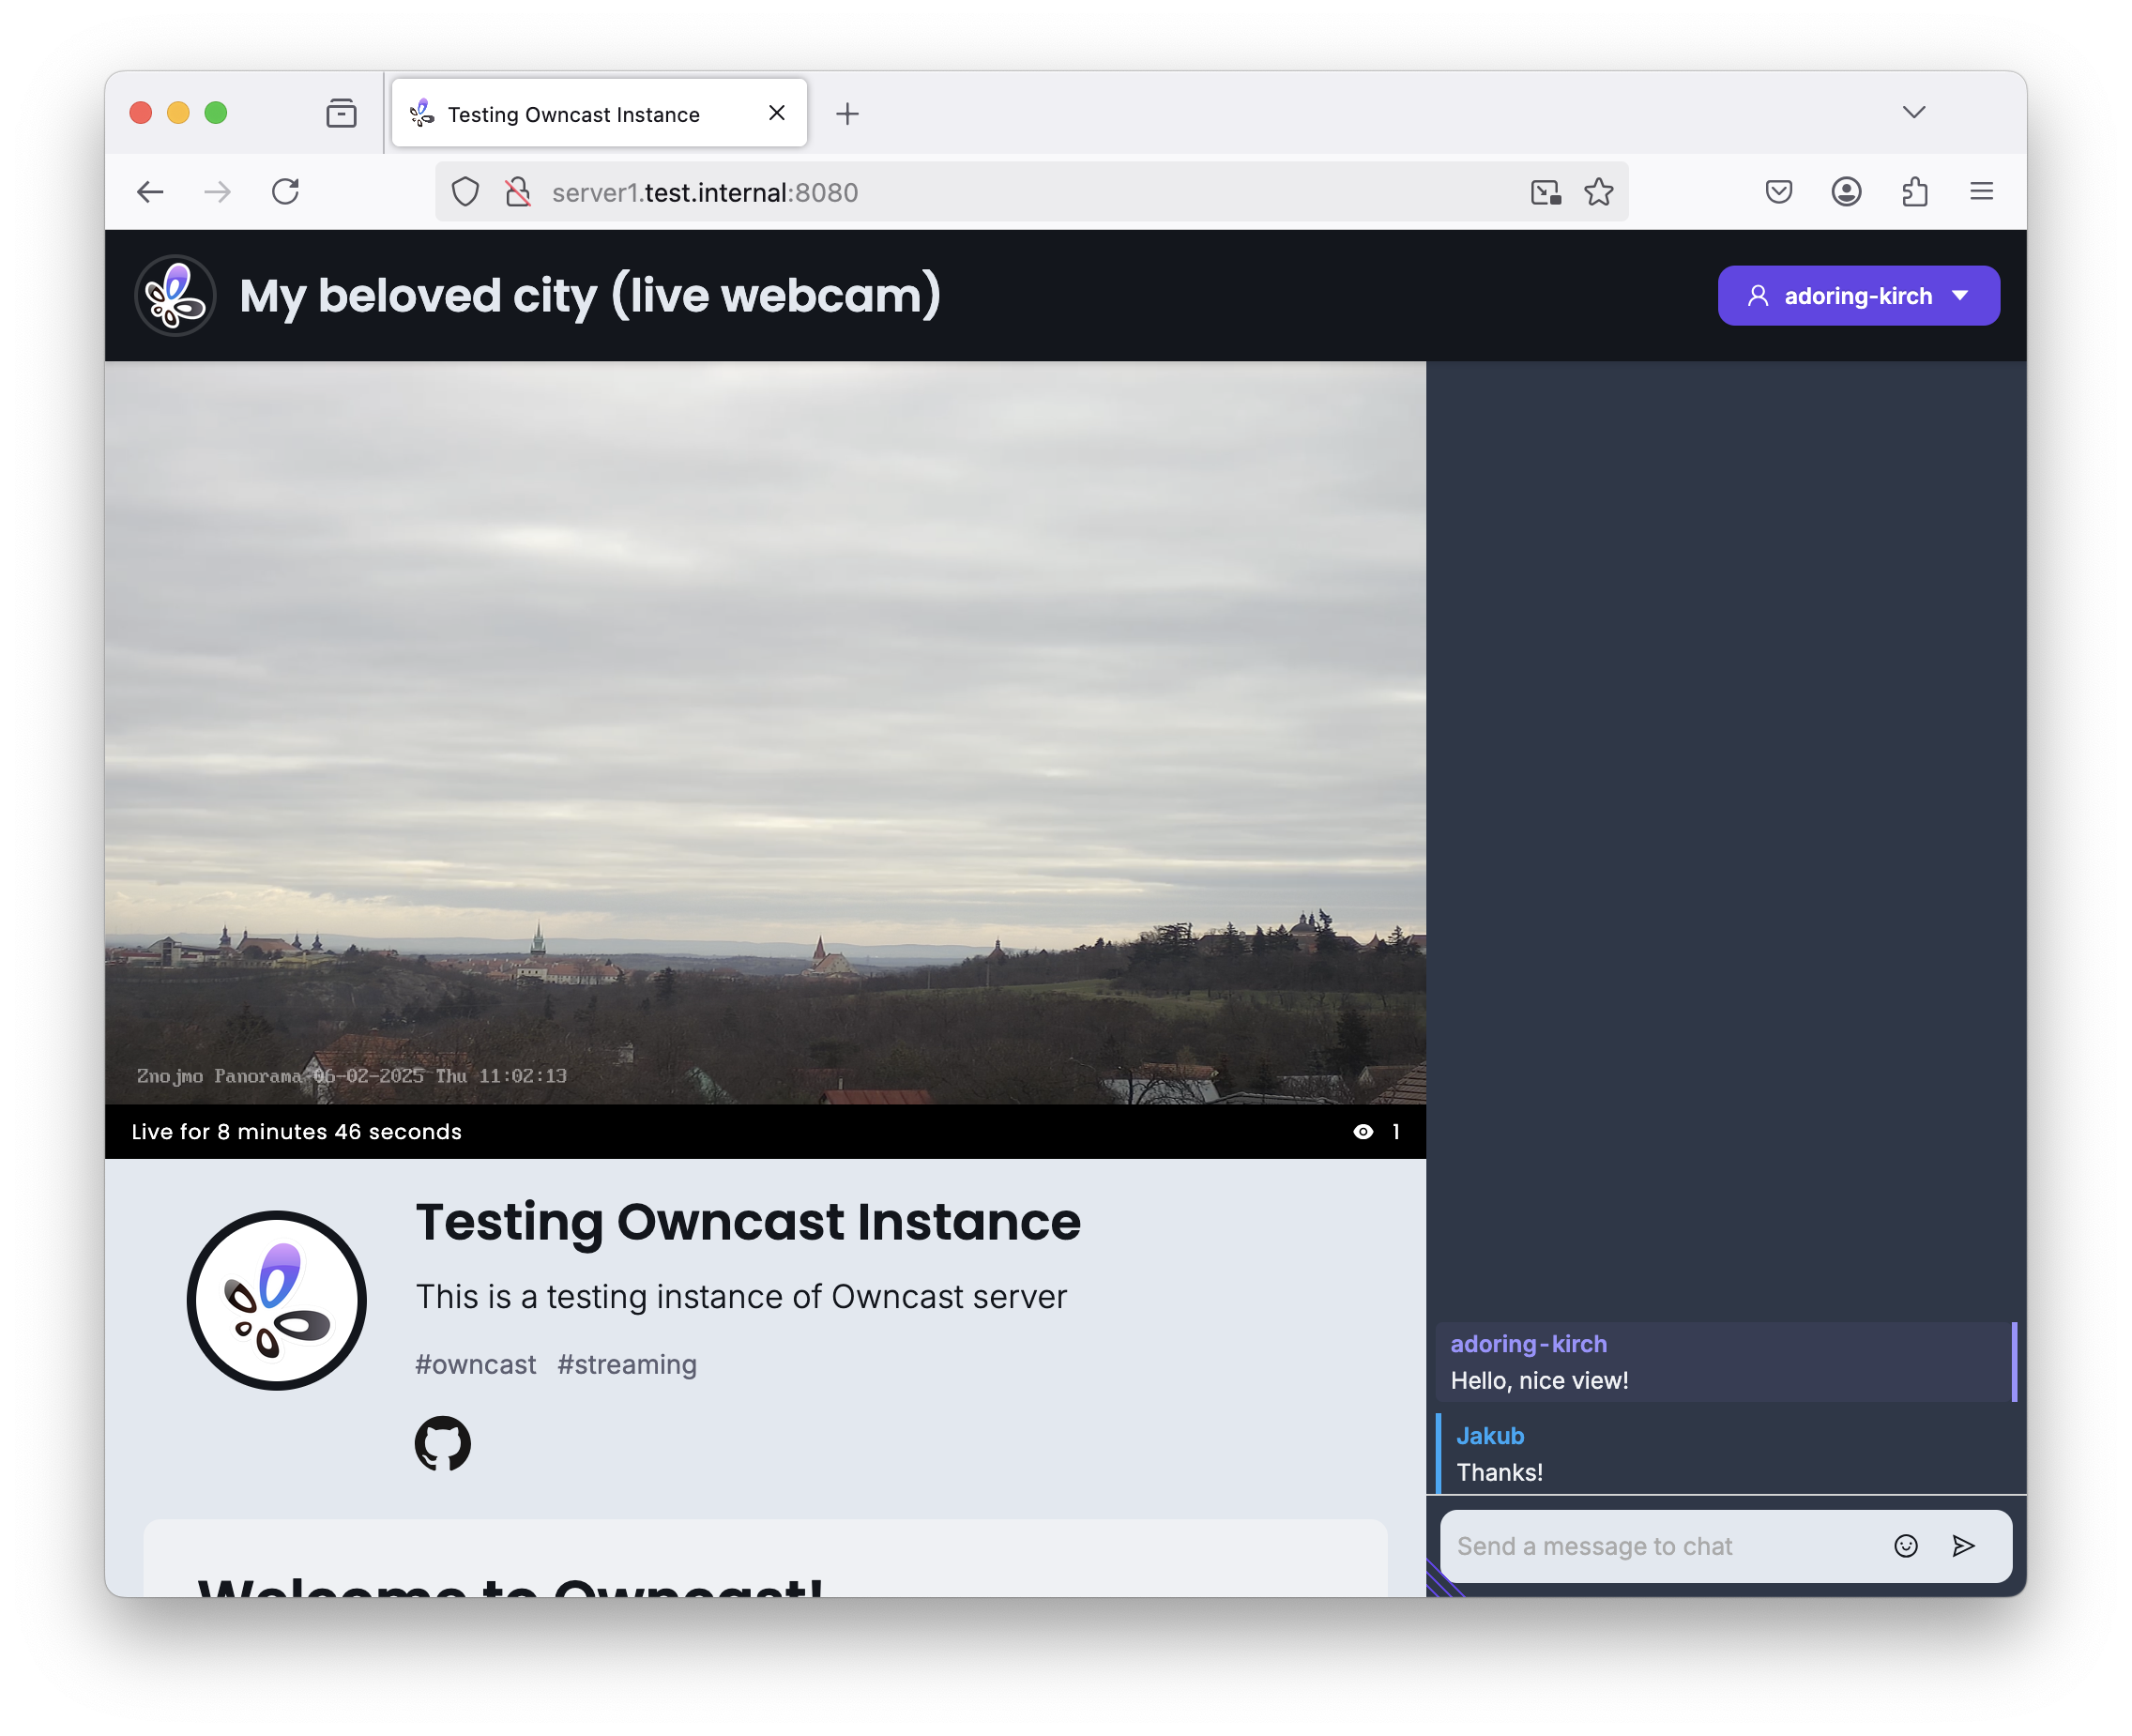
- The platform also has an integrated chat feature.
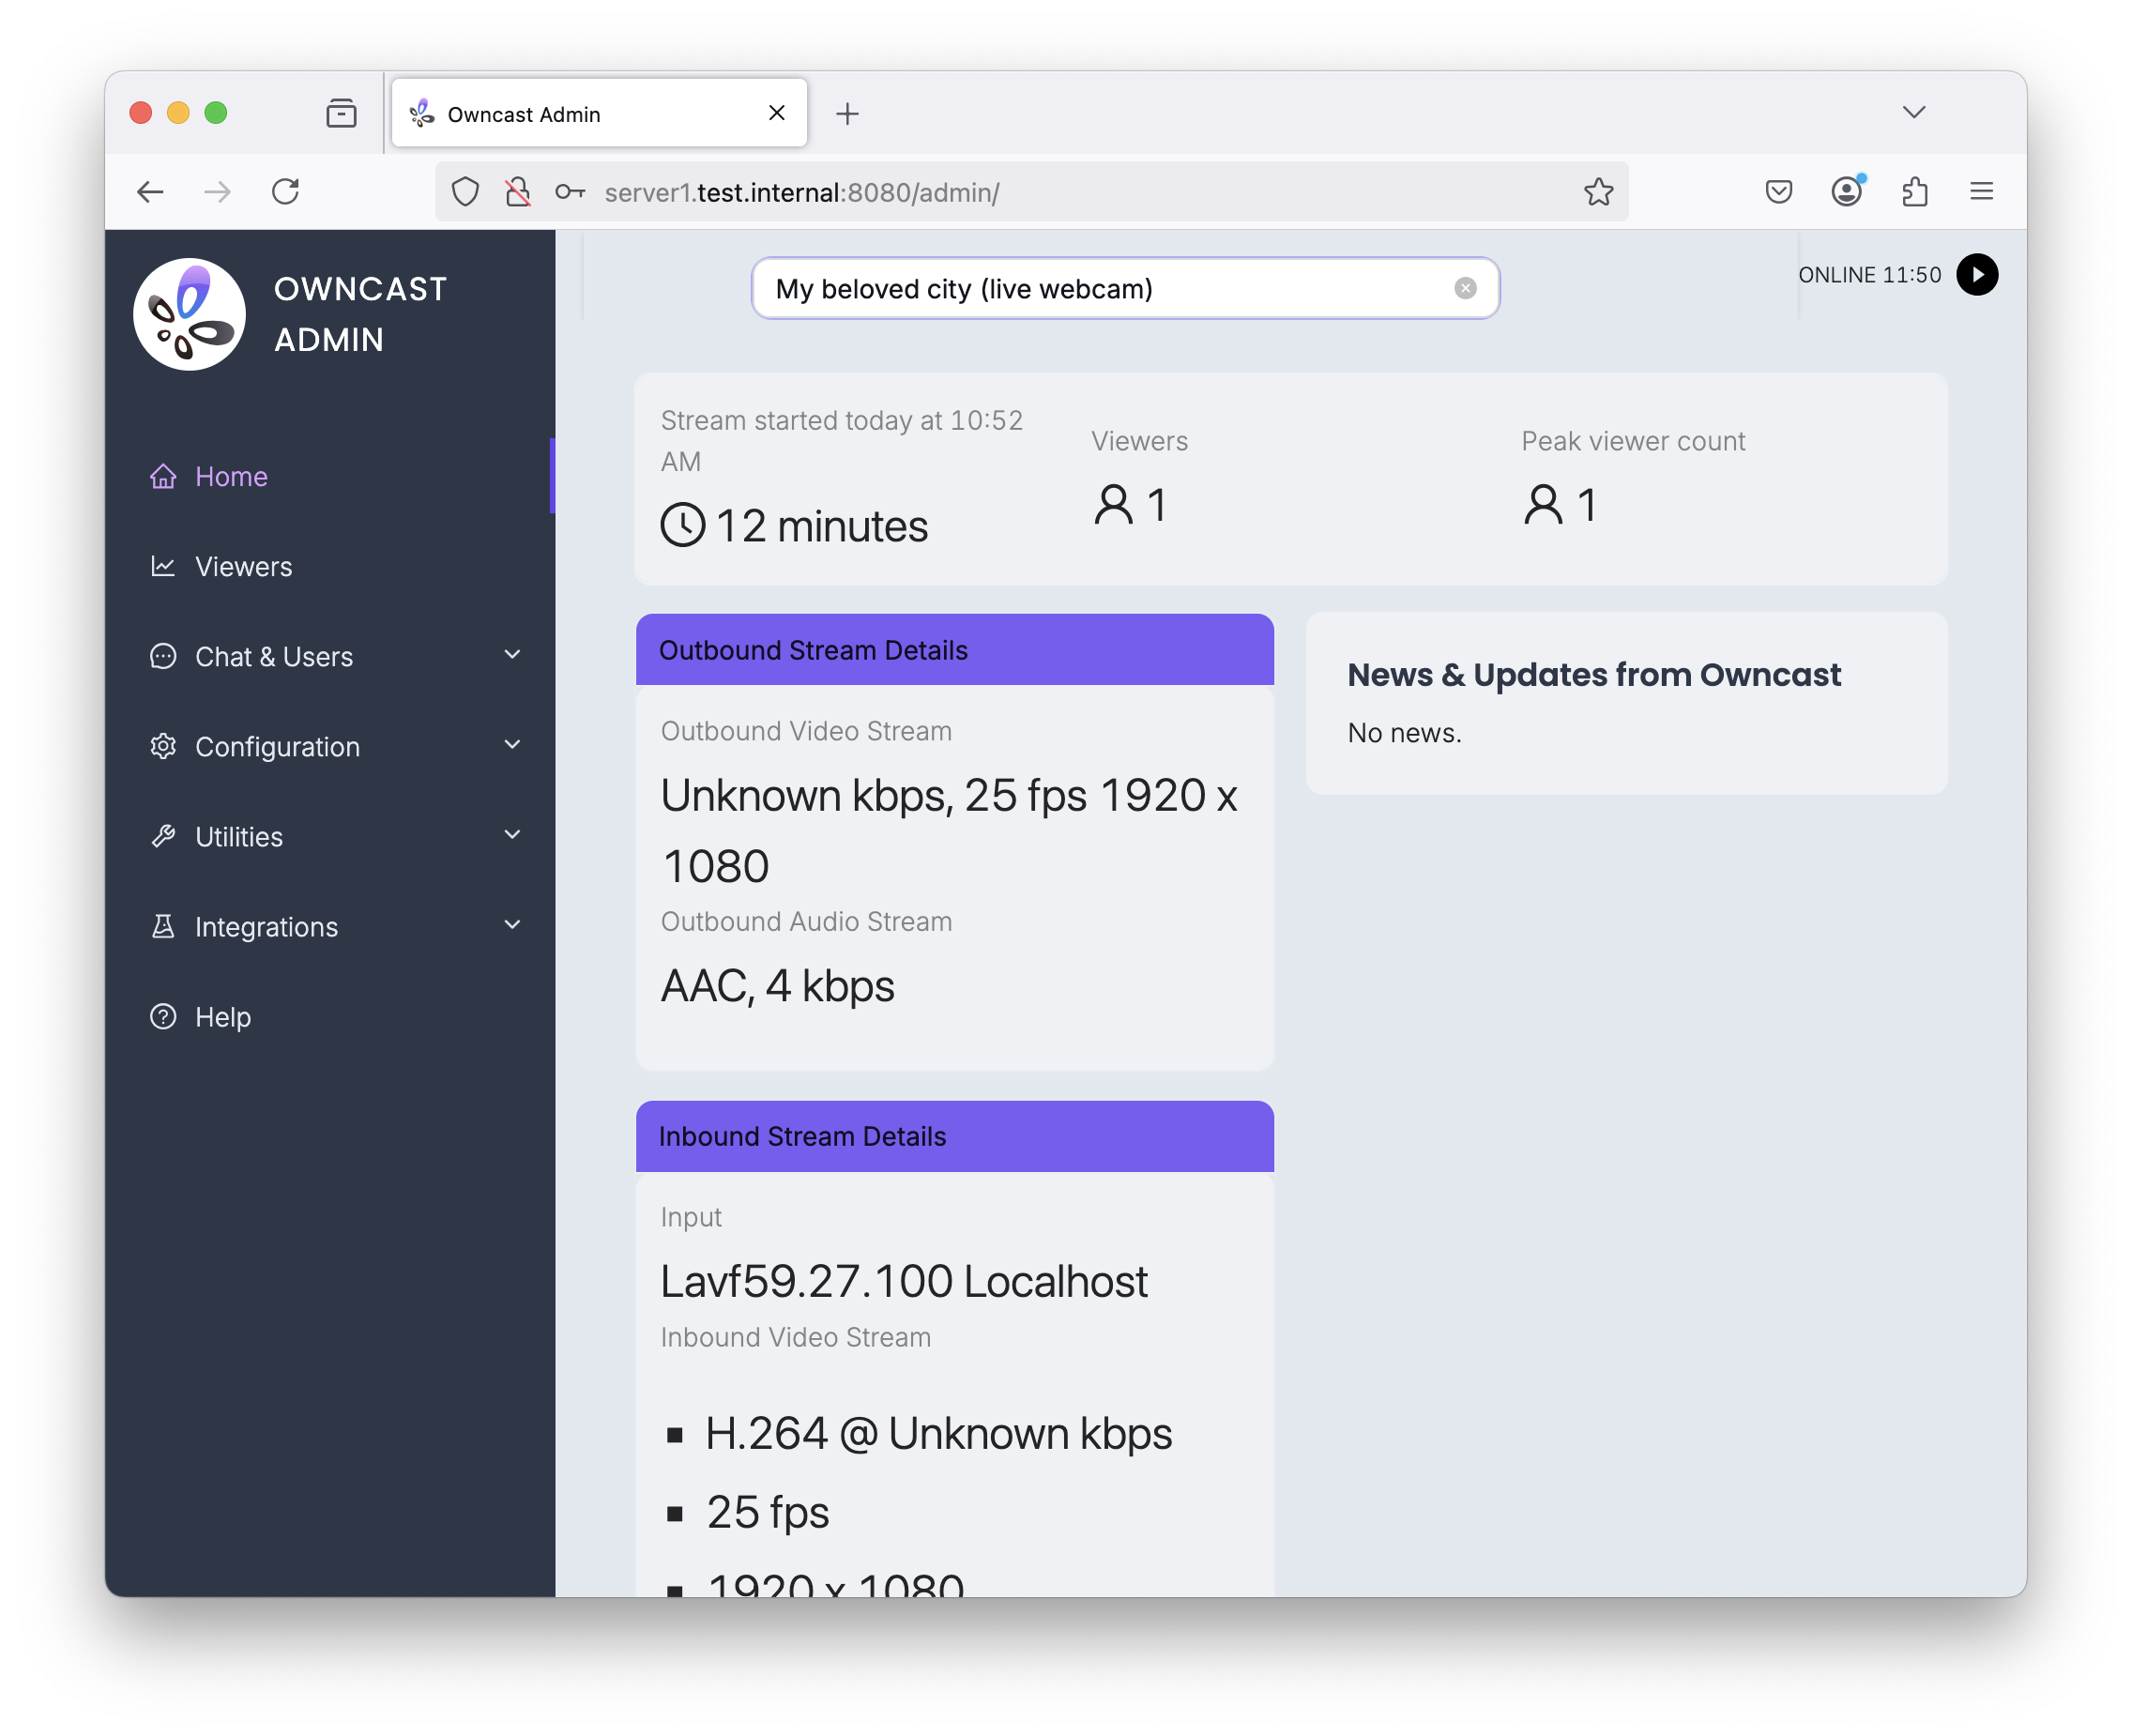
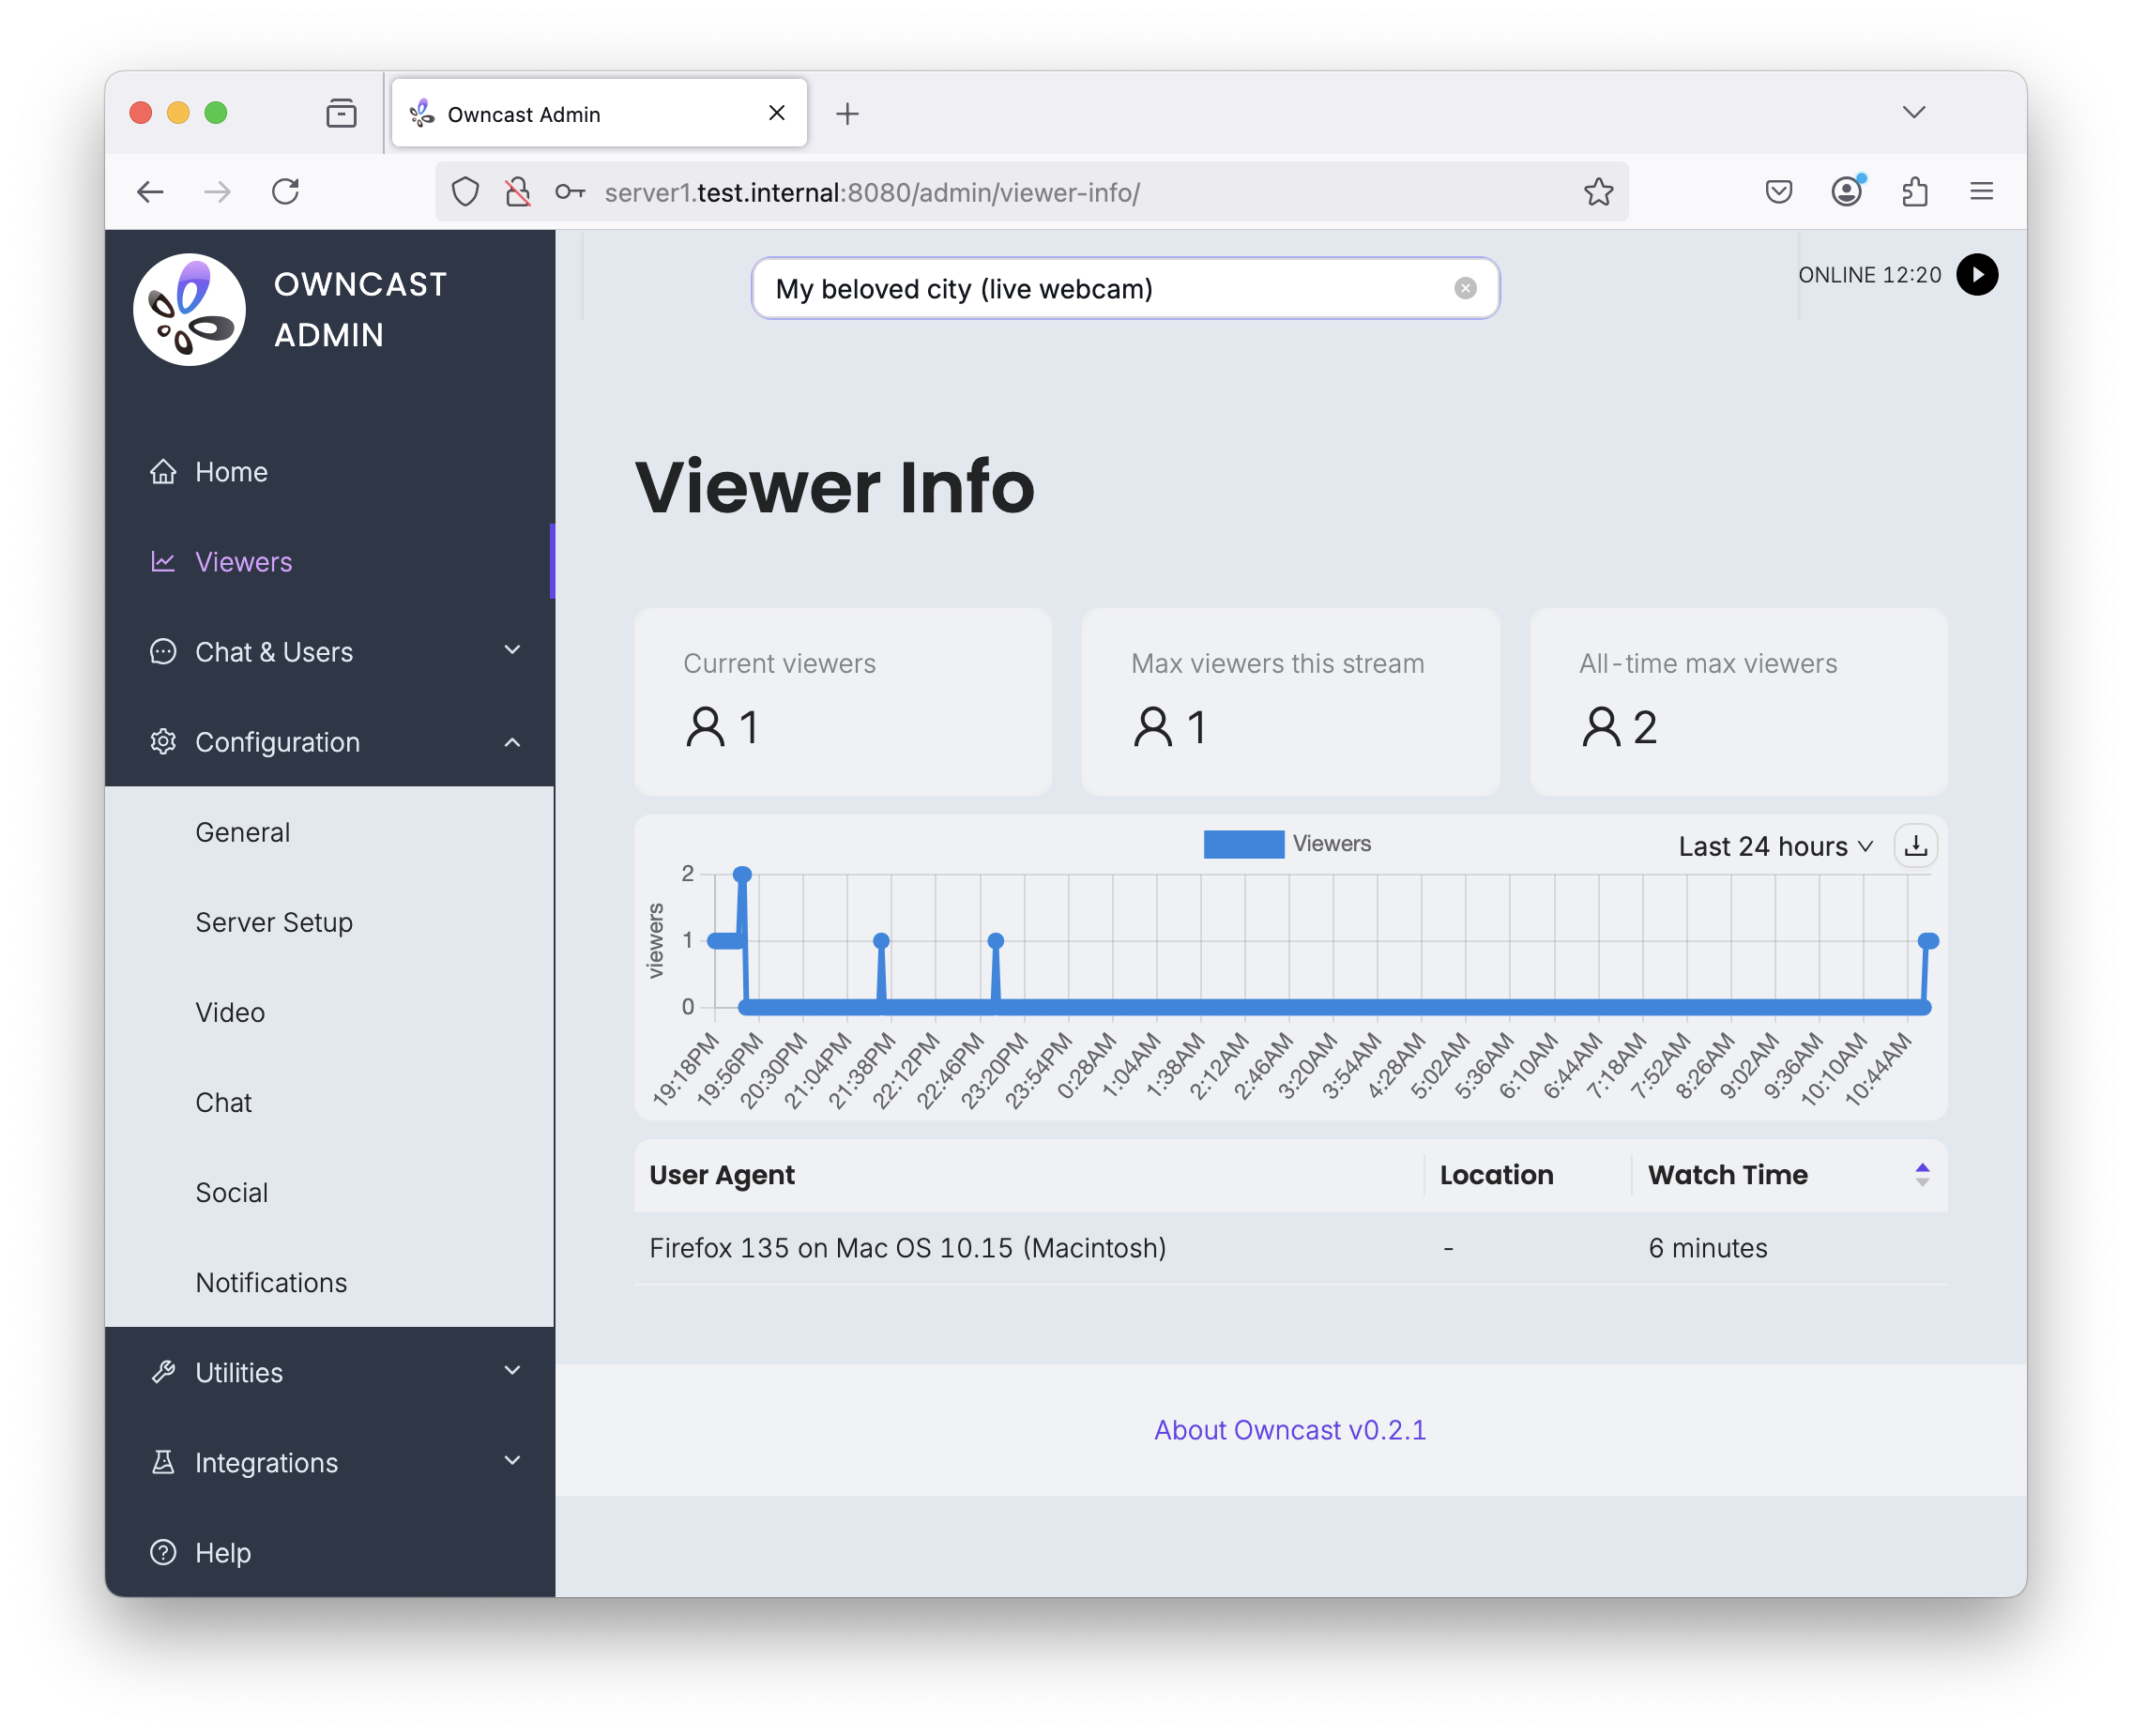
- In the administration web interface, it's possible to publish your server in the streamer registry, which can help attract more attention to your instance.
- Streaming: ★★★★★
- The streaming is smooth. Owncast runs an FFmpeg process internally, which is well-configured to handle dynamic framerates and similar video properties that might change over streaming session (especially if the user plans to re-stream, for example, an IP camera for long periods of time).
- Re-encoding can be quite resource-intensive, so if the streaming source is suitable, it's better to enable passthrough mode. In the administration web interface, this can be enabled in Configuration -> Video -> Stream Output -> Edit the selected profile -> Advanced -> Video Passthrough -> Use video passthrough.
- A minor drawback is that it supports only one stream per server. However, this isn't a major issue since multiple servers can be run on different ports on the same hardware. For this setup, it's recommended to run owncast --help to explore configuration options and create a systemd service configuration accordingly (or even better, use an environment file holding the configuration for that instance).
- A feature I appreciate is the ability to add multiple stream profiles (though this demands more server resources), allowing users to choose from different video qualities in the player, similar to platforms like Twitch or YouTube.
- Video Playback: ★★★★★
- The playback is very smooth. It's also possible to play the stream in VLC if you know the URL; in my case, the address was
http://<server_address>:8080/hls/0/stream.m3u8.
- The playback is very smooth. It's also possible to play the stream in VLC if you know the URL; in my case, the address was
- Installation: ★★★★★
- The installation process is very straightforward using a script. Essentially, running Owncast requires two executable files: the Owncast itself and the FFmpeg binary, which is downloaded in the required version automatically using the installatin script.
- The configuration is stored in a database file that is created upon the first launch. It's strongly recommended to follow the installation process to ensure the server runs under a dedicated user account.
Compatibility
| Server OS Compatibility | Linux, Windows, MacOS (Docker supported) |
|---|---|
| Client Compatibility | Modern web browsers |
| Programming Language | Go |
| Database | SQLite (embedded) |
| Web Server | Built-in HTTP server; administrators are encouraged to use a reverse proxy server to provide HTTPS |
| Dependencies | ffmpeg |
| License | MIT License |
| Configuration | AJAX-based Web Interface |
| Community & Support | Active community; good documentation; install script and official Docker container available |
Installation and Practical Tips
Prerequisites
Begin with a fresh installation of Debian 12 (netinstall). First, install some essential packages:
apt -y install curl unzip sudo
Next, create a directory for Owncast and navigate to it:
mkdir /usr/local/bin/owncast
cd /usr/local/bin/owncast
Create a dedicated user for running Owncast with no login shell and blocked account for security purposes:
useradd -m -d /usr/local/bin/owncast -s /usr/sbin/nologin -p owncast owncast
passwd -l owncast
Download and install Owncast as the newly created user:
sudo -u owncast sh -c 'curl -s https://owncast.online/install.sh | bash'
Set up the systemd service to manage Owncast:
cd /etc/systemd/system
curl -s "https://raw.githubusercontent.com/owncast/owncast/refs/heads/develop/contrib/owncast-sample.service" >owncast-instance1.service
Modify the service file to specify the correct paths and user:
sed -i 's/\[path to owncast directory\]/\/usr\/local\/bin\/owncast\/owncast/g' /etc/systemd/system/owncast-instance1.service
sed -i 's/\[user to run owncast as\]/owncast/g' /etc/systemd/system/owncast-instance1.service
sed -i 's/\[group to run owncast as\]/owncast/g' /etc/systemd/system/owncast-instance1.service
Before starting the server, change the admin password:
sed -i 's/ExecStart\=.*/ExecStart=\/usr\/local\/bin\/owncast\/owncast\/owncast -adminpassword <your_new_password>/g' /etc/systemd/system/owncast-instance1.service
Reload the systemd daemon to apply the changes, then enable and start the Owncast service:
systemctl daemon-reload
systemctl enable owncast-instance1
systemctl start owncast-instance1
After starting the server, make sure to change the default streaming key immediately. This and other settings made in the web interface will persist after server restarts. Navigate to http://
Streaming
To stream to Owncast without re-encoding, use the following FFmpeg command (only if the source stream is in an appropriate format):
ffmpeg -i -codec copy -f flv "rtmp://<your_server_address>/live/<streaming_key>"
For streaming with re-encoding (CPU intensive), use:
ffmpeg -i -vcodec libx264 -preset veryfast -acodec aac -f flv "rtmp://<your_server_address>/live/<streaming_key>"
After starting your stream, wait at least 30 seconds to ensure the stream has started properly and is visible on the web frontend.
If you want to save CPU resources on the Owncast server, you can disable server-side transcoding. Ensure your source is in the correct format, playable by the web interface. Proceed at your own risk and revert changes if streaming fails.
To disable server-side transcoding:
Go to Configuration -> Video -> Stream Output -> Edit the selected profile -> Advanced -> Video Passthrough -> enable Use video passthrough.
For additional details, please refer to the following resources:
Other Details
Developer: Gabe Kangas, Owncast, community